Sun King's Salvation
*Note* - The goal of this fight is to heal the boss so that he later jumps down so you can kill him.
*Note* - The goal of this fight is to heal the boss so that he later jumps down so you can kill him.
|
Phase One Abilities [Stay Spread]:
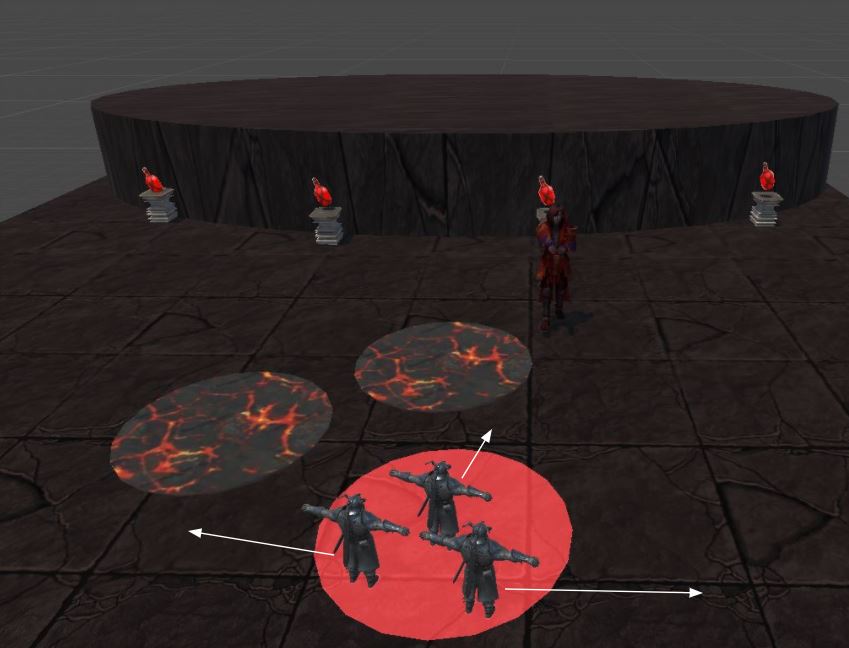
High Torturer Darithos: Greater Castigation: This add will target random people and channel a 6 yard aoe circle on them. Move away from others. Bleakwing Assassin x2: Crimson Flurry: This add will run at a people and do initial and bleed damage to anyone in 8 yards of them. Stay spread out. [Indicated by an arrow on your head] Return to Stone: This add will begin casting for 8 sec. When this completes they will return to 100% health. Kill them before this goes off. Vile Occultist x4: [Priority] Vulgar Brand: [Curse - Dispel/Interrupt] Placed on everyone once the cast finishes after 6 sec. When completed it deals ticking damage and increases damage taken by 35% for 15 sec. Try to zerg them down before they cast it. Scornful Blast: [Interupt-able] The mob will cast shadow bolts onto random players dealing minor damage to them. Unless the raids health is low you can kill them without having to interrupt to many [Also help prolong brand being cast] Door of Shadows: just allows the mob to teleport around you can grip them back Carrying Essence Font: These adds will drop an essence font upon death. These need to be spammed healed to make them go away and in turn heal the boss Intermission: - Right after you kill first set of adds and no new adds are out Soul Pedestal x4: Located near the boss you can click them to siphon your life to heal the boss. You want to use during this time and continue to rotate people through the next phase. Once you use them you won't be able to again for 1 minute without dying. [You can use these at any point in the fight we used them during downtime] Phase Two Abilities [Stay Spread]: Soul Infuser [Priority 1]: Soul Infusion: These little guys will either heal the shade or damage the boss. They will charge to their target and once they reach them begin channeling on them. They need to be killed quickly and slowed before the damage is unrecoverable. Infuser's Orb: Orbs left behind when you kill these guys. Once picked up it increases your healing done by 50% for 14 sec [this can stack]. Rockbound Vanquisher x1 [Priority 2]: These mobs spawn 1 at a time but can overlap with others if not killed quick enough. Concussive Smash: A large aoe the mob does periodically dealing minor damage to the whole raid. However, every time it goes off your damage taken from the ability increases by 25% each time stacking. The mobs need to be killed quickly. Vile Occultist [Waves of 4] Priority 3 Bleakwing Assassin [Waves of 4] Priority 4 Pestering Fiend [Priority 5]: These guys will deal random damage to targeted players [which can't be stopped], but when they die they deal massive damage to anyone in 7 yards. Avoid being near them when they die. Phase Three Abilities: Shade of Kael'thas: Once the boss reaches a certain health a shade will jump down preventing you from healing Kael'thas anymore. Ember Blast: The boss will target a player and after 5 sec deal split initial damage and lingering ticking damage over 15 sec to anyone in 6 yards [indicated by a circle around the player]. When it goes off it will also leave a pool that quickly grows and does massive damage to those still in it. Have 3-4 players soak and quickly spread out after. Fiery Strike [Tank Positioning]: Frontal cone that deals decent damage and ticking damage to those in it. Avoid being in front of the boss. Blazing Surge [100 Energy]: 2.5 sec frontal cone cast on a random person that deals massive damage to those in it. Avoid being hit by this when it's cast. Reborn Phoenix x3: These birds will fixate random people and move to them [indicated by a line]. Try to avoid being to close so your not hit with plumage. When you kill them they will slowly regain health again and reignite once reaching full. So they never die, but you get a grace period once you kill them [20 sec]. Smoldering Plumage: 6 yard pulsing aoe around the bird that deals minor damage to those near it. Range need to primarily focus them, but melee can pop in and out if needed, but not recommended. s |

Greater Castigation
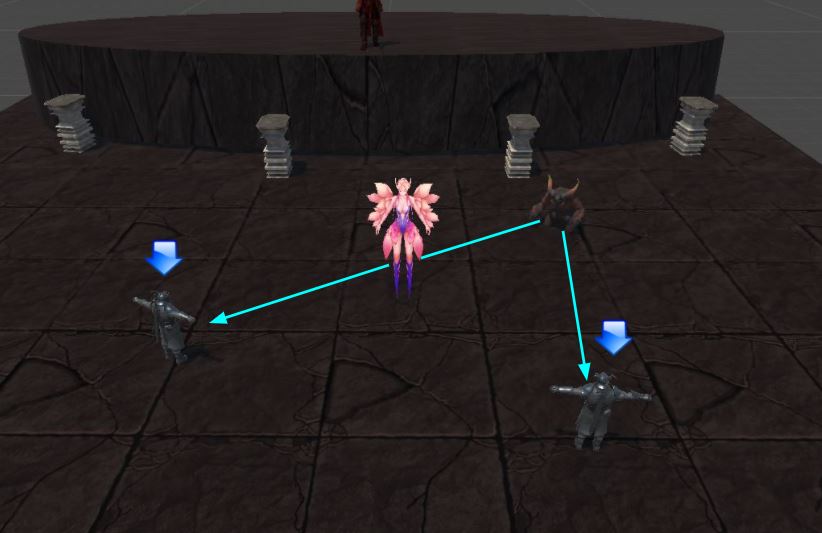
Crimson Flurry
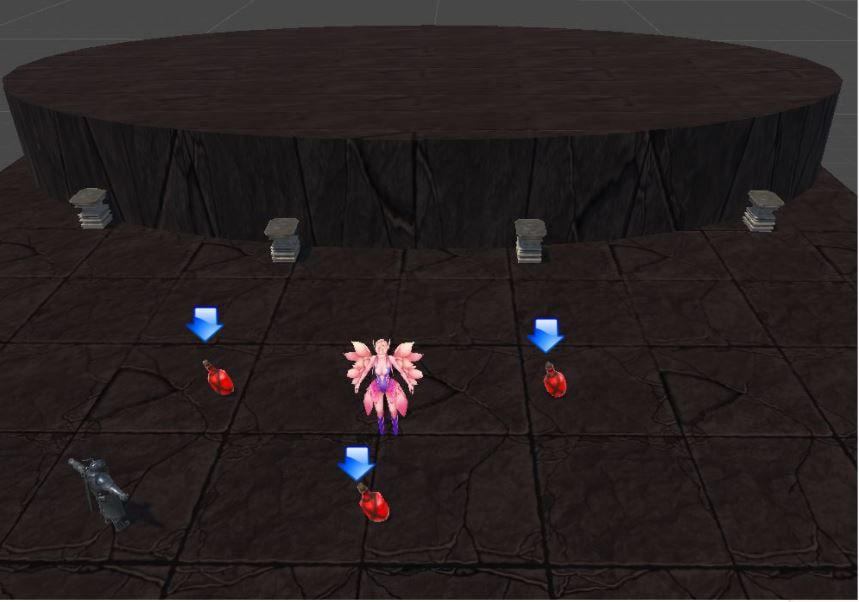
Carrying Essence Font
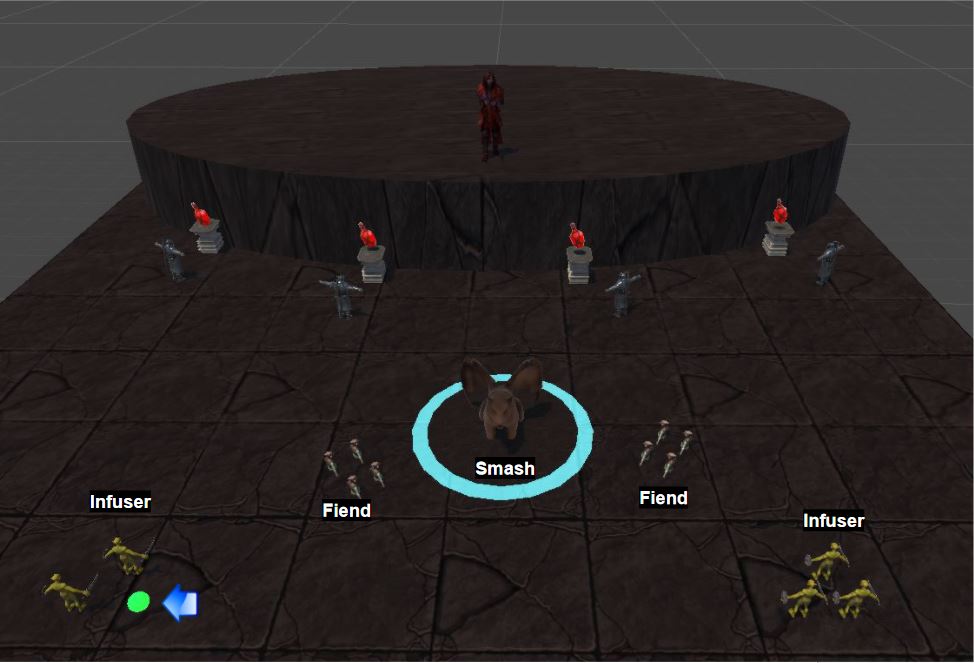
Soul Pedestal
Soul Infusion + Orb
Concussive Smash
Ember Blast
Blazing Surge
Fiery Strike
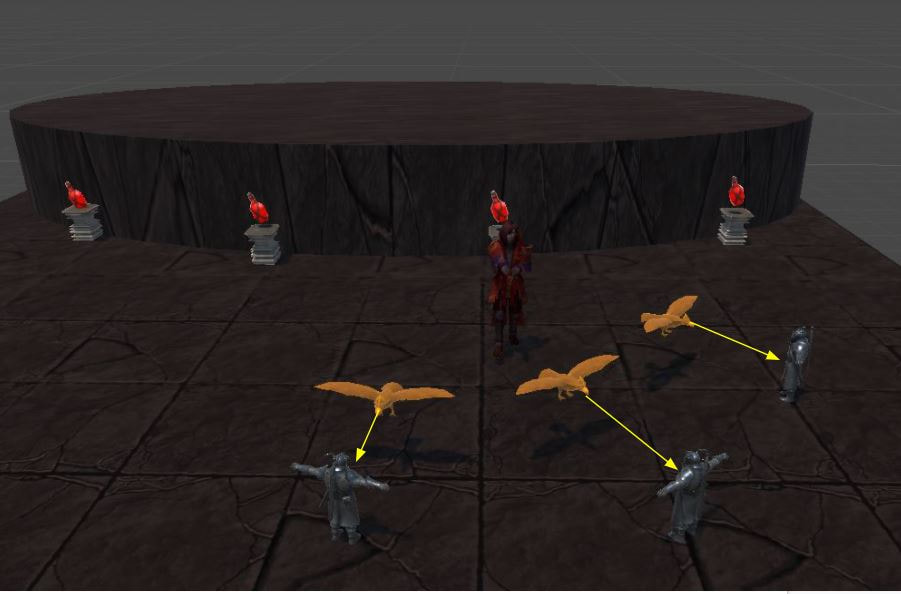
Smoldering Plumage + Fixate
|
What the heck am I hitting size chart:

Vanquisher High Torturer Assassin Occultist Infuser Fiend
P1: ------ Priority 2 Priority 2 Priority 1 ----- ---
P2: Priority 2 ------ Priority 4 Priority 3 Priority 1 Priority 5
P1: ------ Priority 2 Priority 2 Priority 1 ----- ---
P2: Priority 2 ------ Priority 4 Priority 3 Priority 1 Priority 5
Quick Fight Break Down:
|
Phase One [Picture #1]:
1. Move out with castigation Phase One [Picture #2]: 1. Move out when targeted by flurry Phase One [Picture #3]: 1. Heal up the vessels dropped by the occultist Intermission [Picture #4]: 1. Click on the pedestals to heal the boss during intermission and through p2 Phase Two [Picture #5]: 1. Kill the infusers as they come out and healers pick up the orbs they drop 2. Kill the fiends, but move away as they die 3. Move away from the vanquisher during smash Phase Three [Picture #6]: 1. Run away from the phoenix when targeted and kill them as they spawn Phase Three [Picture #7]: 1. Help soak with people targeted by plumage and quickly move away after |


|
