Sludgefist
|
Important Health %:
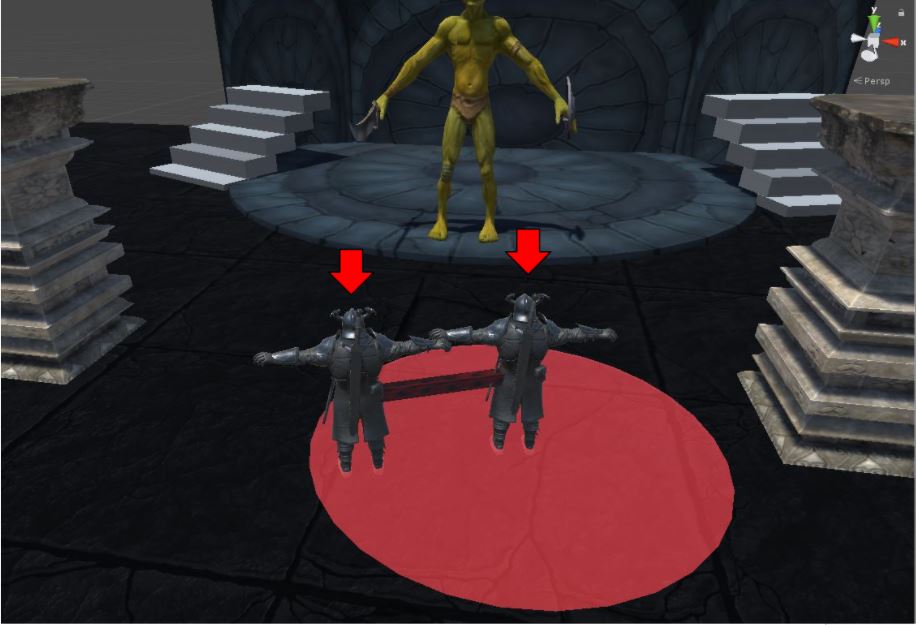
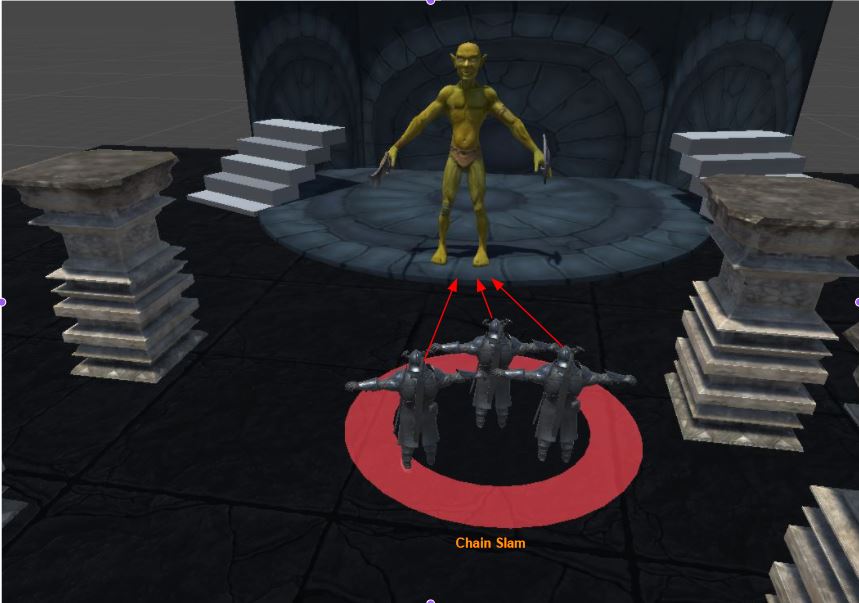
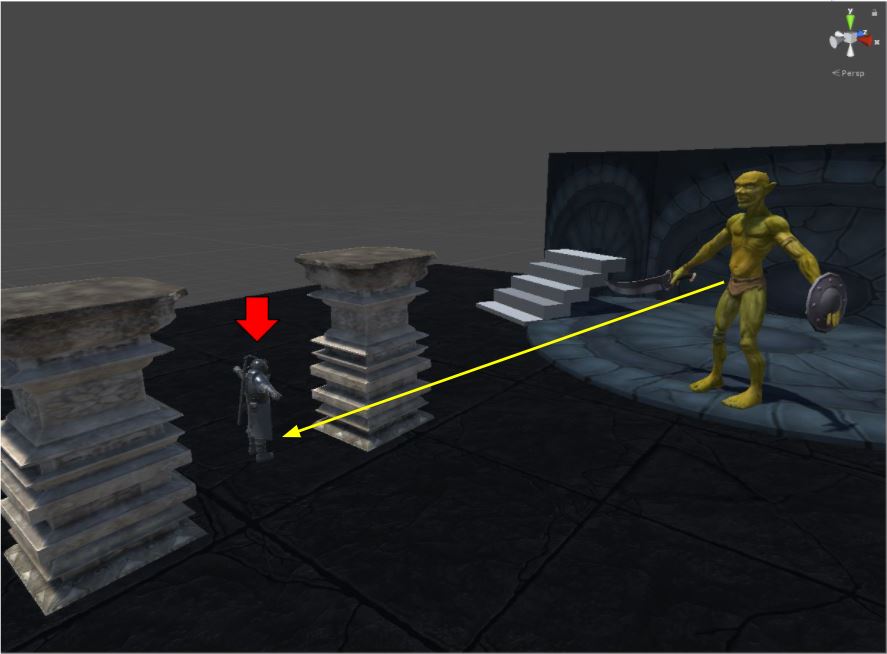
20% Health: The boss will deal 20% increased damage and attack speed Fight Abilities: Falling Rubble: The boss will cause the ceiling to fall at random player locations indicated by circles under them. After they go off a pool is left behind that deals minor ticking damage to anyone standing in them. Standing in the initial impact will deal major damage to the player and stun them for 2 sec. Fractured Boulder: Whenever a pillar is struck rocks will fall indicated by dark brown swirls on the ground. Avoid these or you will take a lot of damage. Colossal Roar: The boss will periodically roar dealing minor aoe damage to the raid and pushing them back. You can still cast during the push back, but position yourself where you won't get pushed out of range of the boss. Chain Link: The boss will choose random players and place a red circle on them. After 6 sec the boss will chain you with the person in your circle. Failure to find a friend during this will result in death and if you move more then 12 yards from your partner you will also die. Once you are linked you and your partner will have arrows on your head so you can easily track them and you will both take minor ticking damage. Destructive Stomp: The boss will deal fatal damage to anyone within 20 yards of him as indicated by a big circle. Any pillars in the blast zone will also be destroyed. Make sure you position him in the very front of the room, very back, or where a pillar is missing when this is about to go out. Chain Slam: The boss will choose a random player and root them indicated by a red circle around around the player. After 4 sec anyone with in 7 yards of them will be pulled into the boss and take fatal damage split evenly among those people. You will need 3-4 people soaking with you to avoid dying. This is very important for chained players since this is usually paired with stomp. You both will need to quickly move out without breaking the chains. Melee Dps & Tanks: Giant Fists: The boss will hit the next closest person within 5 yards of the tank. If it's not the off tank the dps picked will most likely die. Make sure the tanks are within 5 yards of each other and melee dps are not near them. Heedless Charge: The boss will choose the current tank and charge at them after a few second as indicated by an arrow on their head. The tank will need to run behind the closest pillar. When the boss hits a pillar the raid will take decent aoe damage and the boss will be stunned and take increased damage for 12 sec, however if he misses and hits a wall it's a wipe. Dps: Don't be in between the tank and the boss or you will die Healers: Every time a pillar is broken a stacking dot is applied to the raid for the rest of the fight. It's minor at first, but gets increasingly more significant throughout the fight. |

|
Quick Fight Break Down:
|
Fight Abilities [Picture #1]:
1. Avoid standing in stuff on the ground Boulders - Dark Swirls Rubble - Light Swirls with a dark ring 2. Make sure you don't get knocked into anything during his knock back ability Fight Abilities [Picture #2]: 1. Move away from the boss during Stomp. The mechanic range is indicated by a circle around the boss. Fight Abilities [Picture #3]: 1. If you are targeted by chain link find a partner (Have a person in your circle) and stay with in 10 yards of them. You will both have red arrows on your head Fight Abilities [Picture #4]: 1. Move to the person targeted by chain slam and move out once you get pulled into the boss. They will have a red ring around them run into the ring. Tank & Melee [Picture #5]: 1. When targeted with charge the tank needs to move behind a pillar. 2. Everyone else must not be in the path of the boss (the yellow line) |


|
